Tuesday, July 30, 2013

Stitched Medallion

YIKES! It's the end of JULY!!!  I am in a panic here...where did July go? Why do these summer months fly by so quickly? It's true I've been busy hiking, biking, traveling, crafting and playing, but still it can't be the end of JULY!  The good news is that there is still time to play along with us at the The Sketch File. Kathy's got a great sketch for you. She actually has a second version posted just in case you aren't inspired by this one.

For my card, I used the patterned paper as a focal point, punching around a portion of it with a circle punch and stitching along the edge to create a medallion. Then I used embossing folders to create texture for the remaining layers.

Supplies: Cardbase: Recollections, Patterned Paper: Colorbok, Cardstock: DCWV, Embossing Folders: Darice, Ribbon: Offray, Embroidery thread: DMC, Adhesive: Scotch ATG

Sunday, July 28, 2013

I Heard the Bells

I've been in communities around Christmas time that celebrate the Christmas season by ringing a bell or bells in various towers throughout the city. I love to hear the bells ring in song, especially when they play familiar Christmas carols. My card design was inspired by these bell towers and various Christmas/Bell challenges.
To create my bell and tower, I started by dry embossing a brick pattern onto  a piece of red cardstock. I added highlight and detail with colored pencils and markers. Next I cut a window out of the embossed cardstock and added a hand cut bell, again using a colored pencil to add detail. Around the window frame I added punched boughs and pearls.I created a roof from strips of black cardstock. I made a vertical cuts every few centimeters along the strip to create shingles. I layered the strips onto a triangle "roof" shape and created a lower roof with more strips of black cardstock. Using ink and a sponge, I created a sky background then adhered the building to it.  The final touch was to create a weather vane for the top of the tower. The hardest part was cutting those teeny, tiny N,S,E, W letters.

I'm submitting this card for several Chirstmas/Bell themed challenges:
Winter Wonderland's BELL Challenge
Jingle Belles' BELL challenge
 Craftyhazelnut's Christmas Challenge "Anything Goes" challenge 
Merry Monday "Anything Goes: Christmas in July" 
Supplies: Cardbase: Recollections, Cardstock: Recollections, Darice Brick Embossing Folder, Crayola Colored Pencils, Martha Stewart Bough Punch, Queen & Co Pearls, Studio G Ink, MS Word, Scotch Quick Dry Adhesive, Scotch ATG

Friday, July 26, 2013

Sleigh Bells ring...

My mind has been buzzing with ideas since I saw the current challenge at Jingle Belles. Are you ready?
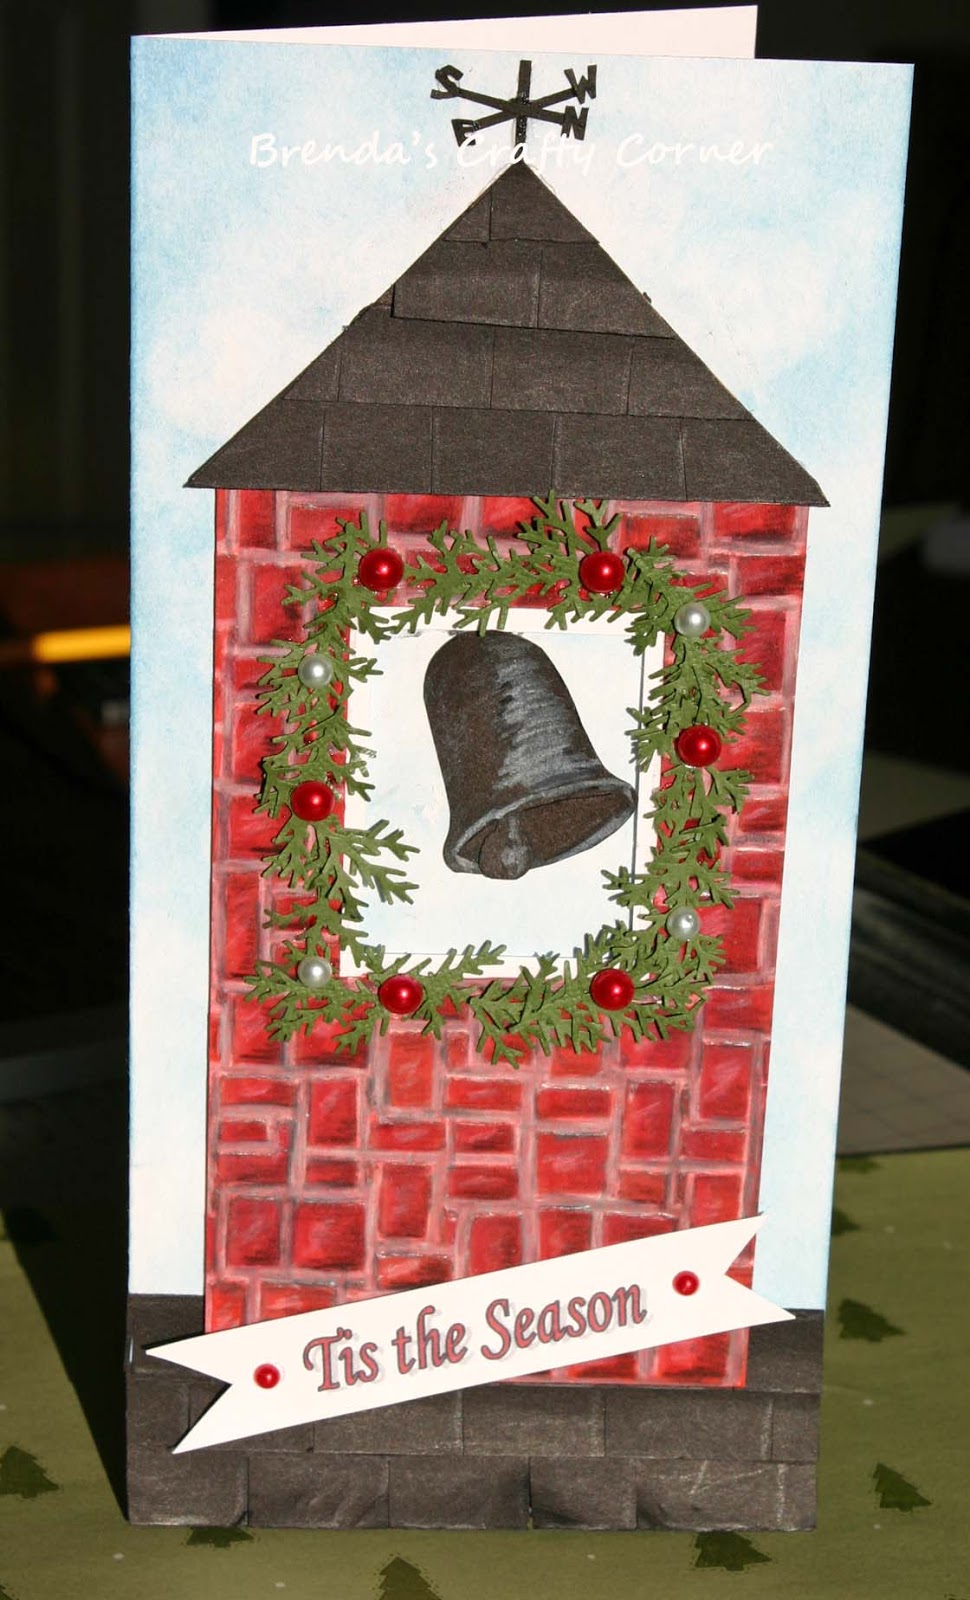
It's "Sleigh BELLES Ring.  Isn't that a fabulously fun prompt? It took me all day to narrow my ideas down, before I finally settled on a sleigh bell harness as the focal point on my card. I began by punching six circles from metallic paper. Next I punched two small holes in the center of each circle. I cut away the metallic paper starting at the bottom of each circle, cutting towards the two small circles at a slight angle. To create the strap for the harness, I took a strip of chocolate cardstock, cut it into the shape of a harness then crumpled it up and carefully flattened it.  I highlighted the texture that this created by sliding a brown ink pad over the top of it.  I punched three holes in the narrow end of the harness, added a buckle that I cut from metallic paper and a small gold brad just below it. I adhered the bells with dimensional adhesive and layered the harness over a piece of patterned. Fortunately, among the Christmas words on the patterned paper,  I found "Sleigh Bells ring..." .  I cut this portion off and created a banner and adhered it with dimensional adhesive. I finished by adding red gems. Since the large photo doesn't really show the texture of the gold metallic paper that I used for the bells, I am sharing a close-up of the  belles.

I decided to link this card up with:
Winter Wonderland, since the current challenge there is also BELLS. 
Hazel's Christmas "Anything Goes" challenge 
and the 
Merry Monday "Anything Goes: Christmas in July" 

Supplies: Cardbase: Recollections, Cardstock: Bazzill (red mat), Core'dinations: chocolate, Metallic Paper: Highgloss, Dimensional Adhesive: Elmer's Glue Spots, Patterned Paper ? (open stock, not sure about manufacturer),Gems: Studio G, Ink: Memento, Adhesive: Scotch ATG, Circle Punch: EK Success


Thursday, July 25, 2013

Christmas Deer

If you are familiar with my blog, you know that I love to create Christmas cards. Since there are two current Christmas challenges ....both "Anything Goes", I decided to create another card for both.  I'm playing along with the "Anything Goes" challenge at Crazyhazelnuts Christmas Challenge as well as the Merry Monday Christmas challenge at Always Playing with Paper.  I started by printing random Christmas related words on a piece of Kraft cardstock. Next I die cut the deer from the Kraft and lightly inked around the edges and added hooves, an eye and a nose with a marker. I adhered the deer to an embossed chevron and dotted cardbase. Before I adhered the deer, I ran a white ink pad over the embossed background to make it pop and added two strips of embossed red cardstock and clear gems.

Supplies:
Cardbase: Recollections: Cardstock: Recollections, Ink: Studio G, Die Cut: Tim Holtz, Embossing Folder: Darice, Gems: Studio G, Adhesive: Scotch ATG

Wednesday, July 24, 2013

Christmas in July

I have been wanting to play along with the "Anything Goes", month long, MERRY MONDAY CHRISTMAS IN JULY challenge at Always Playing with Paper and here I am on July 24th just submitting my first card. I've been wanting to play since I first saw the challenge post at the beginning of July. Sometimes I don't know where the time goes.

Since Craftyhazelnuts Christmas Challenge is also "Anything Goes", I am submitting this there as well.

About my card:
To create my card, I dry embossed a tree using a Fiskars Dry embossing template and green cardstock. I trimmed around it and used a push pin to poke tiny holes in it to create stands of trim, then added small red pearls and a bit of ink. I used a die cut to cut a scalloped oval in the front of a cardbase, then used the push pin once again to poke tiny holes next to the scalloped edge. I adhered the tree, then added decorative tape to the top and bottom of the cardbase.  I finished by adding green ink over most of the white cardbase.

Supplies:
Cardbase: Recollections, Scallop Die: Spellbinders, Decorative Tape: Darice, Tree: Fiskar's Shapeboss, Pearls: Queen& Co, Ink: Studio G, Adhesive: Scotch ATG

Tuesday, July 23, 2013

Leafy Layout

I haven't created many layouts lately. I'm spending too much time creating cards but Kathy's sketch at the The Sketch File has inspired me to create this one. I've used an old photo that I just love. It's a photo of my son, who is now a TEENAGER! The multiple layers on the sketch were perfect for embossing. Since I am soooo hooked on embossing folders right now, I couldn't resist using several different folders! I ended up hand cutting the letters for the title and used wire to create the embellishment.
I hope my layout will inspire you to create your own card/layout using Kathy's sketch. If you are looking for more inspiration,  hop on over to The Sketch File to see the incredible card Jackie has created. I hope you'll be inspired enough to link up your project with us. Can't wait to see how you were inspired!

Sunday, July 21, 2013

Handmade Hydrangea-Like Flowers

It seems like a long time since my last post, but it's only been about a week. I've been very busy with non-crafting projects, but this morning when I saw the handmade flower challenge at Less is More, I just had to play along. I started by inking up a small flower stamp. I repeatedly stamped the image keeping the stamped images close together. I did this until I felt like the combined images looked somewhat like the shape of a Hydrangea. I created two of these images. Then I used ink to shade between each flower.  To create the leaves, I drew in the leaves, making it look like the leaves were behind part of the flowers and colored them in with colored pencils.  Next I fussy cut around the flowers and leaves.  I slightly overlapped the leaves from the two flowers and adhered the flowers to a white cardbase.  I finished by stamping Happy Birthday int the lower corner.

Supplies: Cardbase: Recollections, Cardstock: Recollections, Ink: Studio G, Colored Pencil: Crayola, Adhesive: Scotch ATG, Stamp: Stampin' Up (sentiment), flower: Studio G

Tuesday, July 16, 2013

Stellar Jay Multi-layered Card


Kathy has a fabulous challenge for us this month. She's got an interesting sketch ready for us to play with over at The Sketch File. It's one of those multi-layered beauties. At first I didn't know where to begin, but once I got started it all came together quickly. I started by cutting a Stellar Jay shape from white cardstock and then colored it in with markers and colored pencils. I also added a layer of Diamond Glaze over the top of the bird. It added dimension, that you can't see in the photo. I covered an oval with decorative tape, then wrapped a piece of window screen around it to give it a bit of texture. I layered the bird over embossed layers of blue cardstock and tucked the oval shape behind them. I perched the bird on a torn paper branch and adhered everything to a piece of patterned paper.


So are you up for a challenge? I hope you'll join us over  at The Sketch File. While you're there check out the fabulous layout created by Kathy.
Close up of the details on the bird.

Supplies:  Cardbase: DCWV, Cardstock: DCWV, Patterned Paper: Stampin' Up, Embossing Folders: Darice, Decorative tape: Darice, Window Screen, Scotch ATG Adhesive

Is this WEIRD or WHAT?


love the texture and colors of the yarn
This has to be the strangest card I've ever created! It all started when I visited Lauren Bergold's Blog. She has created an incredible card with the "weirdest supply" she ever purchased. It's all part of the current challenge over at Shopping Our Stash.  We're suppose to fess up and use one of those strange products that we purchased because we just had to have it. Well as you can see
The Red and Blue Skeins of 
Funky Yarn that I JUST 
HAD TO HAVE!
from my photos I JUST HAD TO HAVE this strange yarn. The truth is, I had to have not one, but TWO Skeins of this it (red and bluish). I loved the colors and textures of each and just knew I would use it. Well, it's been sitting in my stash for quite sometime...years in fact. So today I put it to use creating the peacock feathers for my rather strange looking peacock. I started by cutting a white piece of cardstock into a fan like shape using decorative scissors. Next I wrapped the fan with the funky yarn adhering it on the back. To create the peacock body, I hand cut the shape from white cardstock while looking at an image of a peacock on the internet. Next I used ink, colored pencils and a marker to add the detail.  I used dimensional adhesive behind the body and matted the peacock on black cardstock. So what's your strangest or weirdest craft purchase? Are you ready to use it? I hope I see it over at Shopping Our Stash!

Supplies: Cardbase & Cardstock: Recollections, Yarn (purchased at a $ Store), Studio G Ink, Crayola Colored Pencils, American Crafts Galaxy Marker, Scotch Advanced Tape Glider, Elmer's Glue Spots

Saturday, July 13, 2013

Daisy Chain Birthday Card

I'm playing along with the sketch challenge over at Freshly Made
 Sketches. I loved the clean simple sketch created by Linda Suarez. It's one of those sketches that immediately captures your attention.  To create my card, I used a houndstooth patterned paper for the background. I cut it into a rectangle that would fit my cardbase, then cut it at an angle, removing a strip that was about an inch wide. I chose a dark green cardstock and matted each piece of houndstooth and connected each section with a strip of Magic Mesh. I added a chain of punched daisies and used embroidery thread to create a chevron pattern over them.  I printed the sentiment using an MS Word document.

Supplies: Cardbase: Recollections, Cardstock: Fox Paper Co, Patterned Paper: Simple Stories, Daisy Punch: Martha Stewart, Magic Mesh, DMC Embroidery Thread, Scotch Advanced Tape Glider

Friday, July 12, 2013

Sending Lots of Love Your Way

It's been a while since I have played along with a Fusion Card Challenge. I've been eager to play but time would slip away and I would miss the deadlines. The great news is that the current challenge is a MONTH LONG challenge! I am so grateful for the extended time!!! Tonight I was determined to play along and use Lesley's photo for inspiration. I really loved the way the birds were "stacked" with the largest on the bottom and the smallest at the top. So, instead of birds, I created stacked mini envelopes in shades of green. To make the mini envelopes I began by die cutting a series of hexagons that were progressively smaller. I scored each hexagon and folded it to create the envelope shape, then punched or hand cut hearts to adhere to the envelope flaps. I also used a marker to add a bit of pattern to each envelope. Since I had used hexagons to create the envelopes, I decided to adhere the mini envelopes onto an embossed hexagon background that I lightly inked with green ink. I finished by printing a sentiment with MS Word and adhering it just below my stacked envelopes.


Supplies: Cardbase: Recollections, Embossing Folder: Spellbinders, Cardstock: Various pieces from my scrap stash: Bazzill, Recollections, ?, Heart Punch: McGill, Adhesive: Scotch ATG, Ink: Studio G, Marker: Bic Mark It

Tuesday, July 9, 2013

Three in a Row

I'm on a Christmas card creating roll....this is my third card today! I'll playing along with the stocking challenge at Christmas Card Challenges and the Christmas in July challenge at The Paper Players. I handcut the three stockings from pieces of green patterned paper. Then I added white polyfil cuffs and punched stars (with glitter). I handcut the letters for the word JOY from dark red cardstock and adhered it to the stocking cuffs. I layered the stockings onto a piece of light green cardstock, added green ribbon to the top and bottom and matted it with red cardstock. Yippee....my pile of Christmas cards is growing!

Supplies: Cardbase: Recollections, Cardstock: Recollections, red, Light green?, Patterned paper scraps: Oriental Trading, Paper Wishes, Polyfil, Offray Ribbon, Star Punch, Studio G Glitter Glue, Scotch ATG Adhesive


Stuffed Stocking

Texture was my goal for creating this stocking card. I began by cutting a funky looking stocking from cardstock. (The shape sort of looks like it might belong to the Grinch). Then I used Washi tape to cover it so that it looked like it was striped. I created the cuff by adhering polyfil to the top of the stocking. I attached the stocking to a piece of white "brick" embossed cardstock. I also used embroidery thread to stitch around the stocking, which really made it pop. I added red and white polka dot Washi tape to make a frame along the outside edges of the white cardstock, then adhered it to a cardbase that I trimmed with green Washi tape. To finish the card,  I cut out several small gifts and stuffed them into the stocking.

I am linking this card up for two challenges: The Paper Players (for Ann's theme challenge: Christmas in July) and Christmas Card Challenges (stocking challenge)....AND....just for the fun of it, I'll link this card up at The Old Back Porch where crafters share their current projects to inspire others.

Supplies: Cardbase: Recollections, Cardstock: Recollections, Embossing Folder: Darice, DMC Embroidery thread, Decorative Tape: Darice, My Mind's Eye, Polyfil, Adhesive: Scotch ATG

Cardstock Christmas Stocking


I'm linking this card up for three different Christmas challenges. I'm playing along with the Christmas in July challenge at The Paper Players, the cardstock Christmas challenge at Jingle Belles and the stocking challenge at Christmas Card Challenges. Since the challenge at Jingle Belles is to create a card using cardstock only....no patterned paper. I began by hand cutting a stocking shape from red cardstock. Next, I used an embossing folder to add texture. To create the top of the stocking, I reached for another embossing folder. Can you guess what it is? It's really a picket fence embossing folder. I just trimmed around each fence post then flipped the fence upside down to create the cuff on the stocking. I added a bit of glitter to the cuff and small glittered dots along the embossing stripes on the red stocking. For the background, I embossed a piece of white cardstock, added punched green snowflakes and finished by adding a torn cardstock frame.

Supplies: Cardbase: Recollections, Cardstock: Recollections (white), Fox River Paper Co: (red), Bazzill (green), Glitter Glue: Studio G, Snowflake Punch: Emagination, Darice Embossing Folders, Adhesive:Scotch ATG

KRAFTY Concept

Are you ready for a new sketch challenge? Kathy has a
fantastic sketch ready to inspire you over at The Sketch File. She actually has two versions of this sketch.  When I first sat down to use the sketch, I was somewhat at a loss as to where to begin. I find sketches with multi-layers more challenging for some reason.  Once I decided to stick with KRAFT colored cardstocks everything came together quickly. Other than the cardbase, the cardstock that I used was leftover from a previous project. This multi-layered sketch was a great way to use up the bits and pieces.  I hope you will consider joining us this month and show us what you create with Kathy's sketch. I can't wait to see what you link up with us!


Supplies: Cardbase: Recollections, Black Cardstock: Recollections, Patterned Cardstock: My Mind's Eye, Swirl Punch: Marvy Uchida, Flower Punch: Stampin' Up, Embossing Folder: Spellbinders, Adhesives: Scotch Quick Dry, Scotch ATG